“Transform your empty space with virtual staging – Photoshop your way to success!”
Virtual staging is a process of digitally enhancing a photograph of an empty room to make it look more attractive and inviting. It is a great way to make a property look more appealing to potential buyers or renters. With the help of Photoshop, virtual staging can be done quickly and easily. It can be used to add furniture, artwork, and other decorative elements to a room, making it look more inviting and attractive. Virtual staging can also be used to make a room look larger or brighter, or to add a certain style or theme to a room. With virtual staging, you can create a beautiful and inviting space without having to actually move furniture or make any changes to the physical space.

How to Create Realistic Virtual Staging with Photoshop
Creating realistic virtual staging with Photoshop can be a great way to give your home a makeover without spending a fortune. With a few simple steps, you can transform your space into something that looks like it was professionally staged. Here’s how to get started:
Step 1: Gather Your Materials
Before you begin, you’ll need to gather the materials you’ll need to create your virtual staging. This includes a digital image of the room you want to stage, a selection of furniture and accessories, and a copy of Photoshop.
Step 2: Prepare the Room
Once you have your materials, you’ll need to prepare the room for virtual staging. This includes removing any existing furniture and accessories, and making sure the walls and floors are clean and free of clutter.
Step 3: Add the Furniture and Accessories
Now it’s time to add the furniture and accessories to the room. Start by selecting the pieces you want to use and then use Photoshop to add them to the image. You can also use Photoshop to adjust the size and placement of the pieces to make them look more realistic.
Step 4: Add Finishing Touches
Once you have the furniture and accessories in place, you can add some finishing touches to make the room look even more realistic. This includes adding shadows, adjusting the lighting, and adding textures to the walls and floors.
Once you’re happy with the results, you can save the image and share it with friends and family. You can also use it as a reference when shopping for furniture and accessories for your real-life home.
Creating realistic virtual staging with Photoshop is a great way to give your home a makeover without breaking the bank. With a few simple steps, you can transform your space into something that looks like it was professionally staged. So why not give it a try today?

Tips for Enhancing Your Virtual Staging Photoshop
- Start with a high-quality photo. Before you begin virtual staging, make sure you have a high-resolution photo that is free of any distractions. This will ensure that your virtual staging looks as realistic as possible.
- Use the right tools. Photoshop has a variety of tools that can help you create realistic virtual staging. Use the selection tools to isolate the area you want to stage, and the brush tool to add furniture and other elements.
- Add shadows and highlights. Shadows and highlights can help make your virtual staging look more realistic. Use the dodge and burn tools to add shadows and highlights to your furniture and other elements.
- Adjust the colors. Use the color balance and hue/saturation tools to adjust the colors of your furniture and other elements. This will help make your virtual staging look more realistic.
- Add texture. Adding texture to your furniture and other elements can help make your virtual staging look more realistic. Use the texture tools to add texture to your elements.
- Add depth. Use the blur and sharpen tools to add depth to your virtual staging. This will help make your virtual staging look more realistic.
- Save your work. Once you’ve finished your virtual staging, make sure to save your work. This will ensure that you can go back and make any changes if needed.

AI Virtual Staging
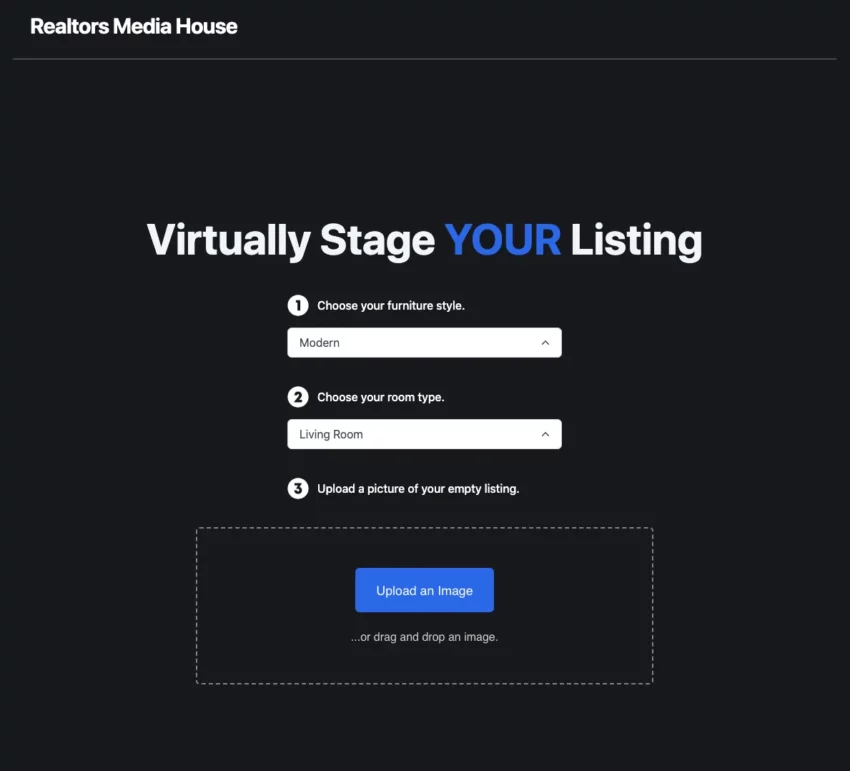
Here are the steps on how to use the Realtors Media House AI Virtual Staging app:
- Go to the Realtors Media House AI Virtual Staging website.
- Click on the “Upload Photos” button and upload your photos of the empty rooms.
- Select the room type and furniture style that you want to use.
- Click on the “Staging” button and the AI will automatically add furniture to your photos.
- Once the staging is complete, you can download your photos or share them online.

The Benefits of Using Photoshop for Virtual Staging
Virtual staging is a great way to make a home look more attractive and inviting to potential buyers. With the help of Photoshop, you can easily create a virtual staging that looks just as good as the real thing. Here are some of the benefits of using Photoshop for virtual staging:
Cost Savings
Virtual staging is much more cost-effective than traditional staging. You don’t have to pay for furniture rental, movers, or any other associated costs. All you need is a computer and Photoshop.
Time Savings
With virtual staging, you can create a beautiful staging in a fraction of the time it would take to do it in real life. You can also make changes quickly and easily, without having to move furniture around.
Flexibility
With Photoshop, you can create any kind of staging you want. You can add furniture, change colors, and even add special effects. This gives you the freedom to create a unique staging that will stand out from the competition.
Professional Results
With Photoshop, you can create a professional-looking staging that looks just as good as the real thing. You can also make sure that the staging looks consistent throughout the entire home.
Using Photoshop for virtual staging is a great way to make a home look more attractive and inviting to potential buyers. With its cost savings, time savings, flexibility, and professional results, it’s no wonder why so many people are turning to Photoshop for their virtual staging needs.

How to Use Photoshop to Create Professional Virtual Staging Images
Creating professional virtual staging images with Photoshop is a great way to give your home a fresh, modern look without breaking the bank. With a few simple steps, you can transform any room into a beautiful, inviting space. Here’s how to get started:
- Start by selecting the image you want to use for your virtual staging. Make sure it’s a high-resolution image with plenty of detail.
- Open the image in Photoshop and select the “Layers” tab. This will allow you to add and manipulate different elements of the image.
- Begin by adding furniture and other elements to the image. You can find a variety of free and paid virtual staging assets online.
- Once you’ve added the elements, use the “Transform” tool to resize and rotate them to fit the image.
- Use the “Brush” tool to add shadows and highlights to the elements to make them look more realistic.
- Finally, use the “Color Balance” tool to adjust the colors of the elements to match the existing colors in the image.
With a few simple steps, you can create professional virtual staging images with Photoshop. Have fun and get creative!

The Best Photoshop Tools for Virtual Staging Photos
Virtual staging is a great way to make a home look more inviting and attractive to potential buyers. With the right Photoshop tools, you can easily create a stunning virtual staging photo that will help you sell your home faster. Here are some of the best Photoshop tools for virtual staging photos:
Layer Masks
Layer masks are a great way to add depth and texture to your virtual staging photos. With layer masks, you can easily adjust the opacity of certain elements in your photo, allowing you to create a more realistic look.
Adjustment Layers
Adjustment layers are a great way to make subtle changes to your photos. With adjustment layers, you can easily adjust the brightness, contrast, hue, and saturation of your photos.
Clone Stamp Tool
The clone stamp tool is a great way to remove unwanted elements from your photos. With the clone stamp tool, you can easily remove any unwanted objects or people from your photos.
Content-Aware Fill
Content-aware fill is a great way to fill in any gaps or holes in your photos. With content-aware fill, you can easily fill in any gaps or holes in your photos without having to redo the entire photo.
Blur Tool
The blur tool is a great way to add a soft, dreamy look to your photos. With the blur tool, you can easily blur out any unwanted elements in your photos, creating a more professional look.
These are just a few of the best Photoshop tools for virtual staging photos. With the right tools, you can easily create stunning virtual staging photos that will help you sell your home faster. So, get creative and start creating beautiful virtual staging photos today!

Q&A
What is virtual staging?
Virtual staging is the process of digitally enhancing a photograph of an empty room to make it look more attractive and inviting. It involves adding furniture, artwork, and other elements to the image to create a more realistic and appealing space.
How is virtual staging done?
Virtual staging is done using a combination of software and techniques. This includes using Photoshop to add furniture, artwork, and other elements to the image, as well as using 3D rendering software to create realistic lighting and shadows.
What are the benefits of virtual staging?
The main benefit of virtual staging is that it can help to make a property more attractive and appealing to potential buyers. It can also help to reduce the amount of time it takes to sell a property, as it can be done quickly and easily.
Is virtual staging expensive?
No, virtual staging is not expensive. In fact, it can be done for a fraction of the cost of traditional staging.
Is virtual staging legal?
Yes, virtual staging is legal. However, it is important to ensure that the images used are not copyrighted or trademarked. Additionally, it is important to make sure that the images used are not misleading or deceptive.

Conclusion
Virtual staging Photoshop is a powerful tool for real estate agents and homeowners alike. It allows them to quickly and easily create realistic-looking images of their properties, without the need for expensive furniture or staging services. With virtual staging, agents can create a more attractive listing that stands out from the competition and helps to attract more buyers. Virtual staging also helps homeowners to visualize their potential home and make decisions about how to best decorate and furnish it. In conclusion, virtual staging Photoshop is a great tool for real estate agents and homeowners alike, allowing them to create attractive and realistic images of their properties quickly and easily.